Monday, October 31, 2016

Halloween Safety Tips & Ideas

Happy Halloween, everyone! As the little ghosts, goblins, firemen, and princess are getting ready for a night of trick-or-treating, it never hurts to review a few safety tips to keep everyone safe. So as a review for everyone, I am sharing a few of the tips and ideas I have come across. 

Tips For Trick-Or-Treaters
  • Avoid billowing costumes or a costume with a long train that could catch fire easily. Buy costumes that are fire resistant or if you are making your own use fire resistant materials.
  • Use a flash light, glow sticks, or a battery operated jack-o-lantern to light your way as you trick-or-treat. 
  • Make sure to look to your left, right, & left again before crossing the streets. Try to cross the street at corners, using traffic lights & cross walks if possible. Walk, don't run, when you are crossing a street.
  • While trick-or-treating put your cell phone down. Keep your head up and be aware of your surroundings. 
  • Children 12 and under should be accompanied by an adult. If they are responsible enough to go out alone, make sure they stick to familiar areas and go with a group of trick-or-treaters. 
  • Decorate your bag or container for your candy with reflective stickers or tape. 
  • If given a choice between face paint and a mask, go with the face paint. Masks can obstruct your view. 
  • Make sure costume doesn't pose a tripping factor, such as being to long.  
  • Wait until children are home to sort and check treats. Though tampering is rare, a responsible adult should closely examine all treats and throw away any spoiled, unwrapped or suspicious items.  
  • Eat only factory-wrapped treats. Avoid eating homemade treats made by strangers. 
 
Tips For Hosting A Party
  • Keep dried flowers, corn stalks, crepe paper, and hay away from open flames and other sources of heat. 
  • Never use "indoor only" lighting sources outside. They could shock someone or do something worse. 
  • Never block exits or escape routes. 
  • Keep candle-lit jack o' lanterns and luminaries away from doorsteps, walkways, landings, and curtains. Place them on sturdy tables, keep them out of the reach of pets and small children, and never leave them unattended.
  • Make sure your porches, walkways, and yard are free of anything that a person could trip on. Masks make it harder to see things clearly.
 
Tips For Driving On Halloween Night
  • Slow down and keep alert. Excited children will move in unexpected ways. 
  • Take extra time to look for children at intersections, around curbs, and medians. 
  • Enter and exit driveway and alleys slowly. 
  • Eliminate distractions inside your car so you can put your focus on the road and your surroundings. 
  • Popular trick-or-treating hours are 5:30 p.m. to 9:30 p.m. so be especially alert for kids during those hours.
  • Drive slowly, anticipate heavy pedestrian traffic and turn your headlights on earlier in the day to spot children from greater distances.
 
Be safe out there everyone and have fun! Try not to overload on candy! Happy Halloween!
 
Safety Tips Resources & Links:

Friday, October 28, 2016

Homemade Halloween: A Cinderella Costume

Cinderella was an obsession of DD's for a long time. We watched the movie almost every day. DD would also give a detailed reenactment of Cinderella being transformed for a maid to a princess. So that year, Cinderella was the inspiration for Halloween that year. 

Almost a year before, DD was a flower girl in my brother's wedding. My SIL picked out a silky, lacy, long white dress for her to wear. This dress served as Cinderella's dress. I pulled DD's hair up into a pony tail. I then took the pony tail and doubled it over toward her forehead and secured it with a big pearl hair clip. When I finished, her hair looked like it was up in a bun with a tiara on her head. She wore some of her frilly socks and a pair of clear plastic slippers she had in a dress up box. To collect her candy in, she carried a galvanized bucket with her Cinderella book tucked in it. She even performed her reenactment a few times.

All of these costume ideas, I have shared with you were easy to make. They just required a little imagination. DD was very comfortable in them too, because she wore most of the clothing we used to make the costumes. They also weren't tight, binding, or awkward for her to wear. The best part for us as family on a tight budget, they didn't cost us much which we liked a lot. 

Homemade Halloween is simply a good thing!  

Thursday, October 27, 2016

Homemade Halloween: Minnie Mouse Costume

When she was around 3 years old, DD had a Minnie Mouse Doll she loved. Minnie slept with her most nights and spent many hours with DD playing. Minnie served as an inspiration for DD's costume that year. 

Minnie wore a dropped waist hot pink dress with white polka dots on it. She had a pearl necklace and a big hair bow in her hair, between her ears. She wore white socks and black shoes. I figured it wouldn't be too hard to come up with something close to her appearance with the clothes DD had in her closet. 

I found a hot pink short sleeved dropped waist dress. We put a black long sleeve turtle neck underneath it. I found some white ribbon which I made into a bow and attached it to the neck of the dress in the middle. I had a long yellow plastic pearl necklace leftover from my teenage years in the 80's for DD to wear. The socks and shoes were easy to do, because DD had a lot of frilly white shoes and a pair of black shoes. 

Figuring out the ears required a little more work. I used a black headband I had as the base. I made some ears out of cardboard and used permanent markers to color them. I stapled the ears on to the head band. When we put the ears on DD, we fastened a big white hair bow in the middle. When our Minnie Mouse was ready to go trick-or-treating, she carried her Minnie Mouse Doll with her. We used a ghost pail she got a Happy Meal in to collect the candy. 

DD really liked this outfit. We also received a lot of compliments on it. Once again, it was easy to come up with and didn't cost us any money. 

Homemade Halloween is simply a good thing! 

Wednesday, October 26, 2016

Homemade Halloween: A Black Cat Costume

The last year DD went trick-or-treating was her 6th grade year in school and she went as a black cat. Once again, we used clothes that she had in her closet. I figured out how to make some cat ears and her daddy came up with a tail. The only thing I did buy was a black eye liner. So, we spent a little money but it was less than $5.00.

DD had a black pair of jeans and a black turtle neck. Those items were the bases of the costume. To make the ears, I took a black headband I had and attached cat ears I made out of cardboard to it. We kept her hair long and loose. DH came up with the tail by looking at work for some leftover braiding used to trim furniture out with. We attached it to her jeans with a safety pin and frayed the end of the tail to give it bushy look to it. I used the black eye liner to draw a cat nose and whiskers on her nose and face. She carried a plastic jack-o-lantern to collect her candy in. 

We got a lot of compliments on her black cat costume. It was easy to throw together which is such a plus with me. It also hardly cost us anything, which is always a plus. 

Halloween is getting closer, so get those creative juice flowing. Look at what you have on hand and see what you can come up with. You might just surprise yourself! 

Homemade Halloween is simply a good thing!

Tuesday, October 25, 2016

Homemade Halloween: A Little Farm Girl

Another easy Halloween costume idea is a little farm girl costume. Again, it uses items that you probably already have on hand. The best part - it will cost next to nothing!

In the midst of a very busy year in our life, Halloween was upon us before I knew it. I had to come up with a costume, quick. After looking at DD's clothing, an idea quickly formed. 

She had a well worn pair of blue jean overalls that she wore around the house. We put a white turtle neck long sleeve shirt underneath them. She didn't have any boots so we pulled out the snow boots she had, to wear with the overalls. For her hair, I braided it into 2 braids, then we put on a Ford tractor baseball cap her daddy had that was a little worn and dirty. I then took a brown eye liner pencil to dots freckles across her nose and cheeks. To collect her candy in, we took a small galvanized bucket and lined it with a red handkerchief. That little extra touch just added to the whole thing.

Once her outfit was all set, she was ready to go trick-or-treating. It was a simple idea, but was very simple to throw together too. Not to mention the best part - it didn't cost us anything! 

Homemade Halloween is simply a good thing! 

Monday, October 24, 2016

Homemade Halloween: A Ghost Costume

Halloween has never been a big deal around our house. We did however take DD trick-or-treating when she was little. All of the costumes were homemade or had homemade elements added to it. Most of them were really easy to make. 

For the first Halloween we took DD trick-or-treating we dressed DD as a ghost, a friendly ghost. We took one of her daddy's white t-shirts and used a permanent black marker to draw eyes and a friendly smile. We put that over a mostly white jogging outfit she had. She wore white socks and white tennis shoes. I pulled what little hair she had on top of head in a pony tail and secured it with a white scrunchy. She carried a ghost pail she had got a "Happy Meal" in from MacDonald's. Viola, we had a friendly ghost!

She liked the costume because it was comfortable. We liked it because it didn't really cost us anything and it was easy to make. We received a lot of compliments are our friendly little ghost and her costume. 

Halloween costumes don't have to hard to make or cost a arm and a leg. Just get those creative juices going and work with the materials you have on hand. You will never know what kind of character maybe laying around your house. 

Homemade Halloween costumes are simply a good thing!  

Friday, October 21, 2016

A Week Of Party Recipes: Chip Beef Cheese Ball

A Chip Beef Cheese Ball is my favorite party food. I am usually the first to get into and wind up eating the most of it. However, I had a problem. I didn't know how to make one. My momma has told me many times how to make it but I need a recipe to follow and I finally found the one. Haven't tried it yet, but I am ready to.

Chip Cheese Ball
  • 3 - 8 oz. blocks of cream cheese
  • 4 - 2.5 oz. pkgs. of chipped beef
  • 1 medium onion, chopped fine
  • 2 Tbsp of Accent
  • 2 Tbsp of Worcestshire Sauce
 
This recipe will make 2 cheese balls. To make one cut all the ingredient measurements in half. 
 
Combine the cream cheese with 3 packages of chipped beef. Add the onion, Accent, and Worcestershire sauce and mix well. Form into 2 balls.
 
Chop up the other package of chipped beef into fine pieces. Roll the cheese balls in the finely chopped beef. Chill and then serve with your favorite type of crackers.
 
This will keep in the frig for up to 3 weeks. 
 
I love, love this! I am so going to make one for the upcoming holiday celebrations! 

Thursday, October 20, 2016

A Week Of Party Recipes: Taco Dip

Taco Dip is one of my husband's favorite recipes. It is an easy dip to make and another alternative to salsa or regular dip. I think if you make it you will agree. 

Taco Dip
  • 2 - 8 oz. blocks of cream cheese
  • 16 oz. of sour cream
  • 1 pkg. of taco seasoning
  • small white onion, chopped
  • 1/2 cup of chopped bell peppers (use a combination of green, red, yellow, and orange peppers), chopped
Using mixer, mix together sour cream, cream cheese, and taco seasoning.
 
Pour into a medium size dish. Spread evenly. Top with chopped onion and peppers. Sprinkle with a little black pepper.  Chill and enjoy!
 
Serve with warm restaurant-style tortilla chips or with multi-grain tortilla chips. Or with room temp chips. The choice is yours! 
 
Living a simple life and loving the simple things of life!

Wednesday, October 19, 2016

A Week Of Party Recipes: Two Fruit Dips

Most of us like to serve some sort of healthy food or snack at gatherings or parties. Fruit is always a popular choice. When fruit is served with a delicious dip, it makes eating the healthy a little more decadent. I am going to share two very easy fruit dips with you that I am sure you and your family will love. 

Yogurt Fruit Dip
  • 1 - 8 oz. strawberry yogurt
  • 1 - 12 oz. cool whip
 
Mix together with a whisk and chill. Serve with bite size pieces of fruit. 
 
 
Fruit Dip
  • 1 - 8 oz. block of cream cheese, softened
  • 1 - 7 oz. jar of marshmallow creme
 
Cube up the cream cheese and place in your mixer bowl. Beat with the whisk attachment until creamy. 
 
Add the marshmallow creme and whisk until fluffy. 

Chill. Serve with bite size pieces of fruit.

Easy, simple, and delicious! Enjoy!

Tuesday, October 18, 2016

A Week Of Party Recipes: Lemondae

Homemade lemonade is good any time of the year. It isn't that hard to make and taste all so yummy. The recipe I use is an Amish one. My daddy really likes it because he said it tasted like the lemonade his grandmother use to make. I can think of no greater compliment. 

Lemonade
  • 6 medium size lemons
  • 3 cups of sugar
  • 6 quarts of water

To begin, roll each lemon between the heel of your hand and the kitchen counter top. This will help release the juices in the lemons.  

Before slicing the lemons, get 2 quarts of water on and bring to a boil. Turn down and keep warm until it is needed.

Next slice off the very end tips of the lemons and discard. Slice all of the lemons. Each lemon will yield about 5 to 6 slices.
 

Save 4 or 5 of the prettiest slices to float in the pitcher of lemonade.

In a large bowl, add 3 cups of sugar. Add the sliced lemons on top. Using a potato masher, mash the lemons and the sugar together. When the sugar on top looks good and wet with lemon juice, use a rubber spatula to turn the sugar on the bottom to the top & continue to mash. Mash until most of the pulp is gone from the lemon juice and all of the sugar looks wet.

This next step you will have to be adapted to what materials you have on hand. I set a colander over the top of a gallon & a half thermos that I pour the lemonade in.

Add part of the 2 quarts of warm water to the bowl with the sugar and lemons in it. Stir until most of the sugar is dissolved. (You will probably not get all of the sugar to dissolve, but you can take care of that in another step.)

Pour the water, sugar, lemon mixture into the colander. Using a colander will allow the liquid to drain and will leave behind seeds and big lumps of pulp.

Take the what is left of the lemons in the colander and squeeze what juice is left back into the bowl you had the sugar and lemons in. Discard the remnants. Pour the rest of the warm water into the bowl to help dissolve any sugar left in the bowl. Pour this liquid back into the colander, letting the liquid drain.


Now add the remaining 4 quarts of water to the thermos and stir. Chill until ready to serve.  

To serve, I pour the lemonade in a pretty pitcher making sure to put in the pretty lemon slices on top and one of the side for a pretty granish. Enjoy! 

Monday, October 17, 2016

A Week Of Party Recipes: Cheerwine Punch

With Halloween getting closer and the holiday season just around the corner, I thought I would share of the recipes I use to take to parties or family gatherings. All of them are easy to make. All of them have been tested and declared yummy by my toughest critics - my family.

The first is made with the "Wine of the South" - Cheerwine. Cheerwine is a soft drink created in my lovely state of NC. It is a favorite here in my neck of the woods and is the only soft drink we drink in our household. When Cheerwine is combined with pineapple juice, it  becomes a tasty punch. 

Cheerwine Punch
  • 3 - 2 liter bottles of Cheerwine
  • 2 - 46 oz cans of unsweetened pineapple juice

Combine all of the ingredients in a large bowl. Stir a little to get the ingredients well combined. Chill in frig until ready to serve. Enjoy!

When I make this punch, I pour some into a pretty bundt pan I have and place it in the freezer. When I am ready to serve the punch, I soak the frozen bundt pan in some warm water to loosen the frozen ring of Cheerwine Punch, then I place the frozen ring in the punch bowl. This helps to keep the punch cold without diluting it. 

We served this punch at my grandmother's 90th birthday party. It was wiped out by the end of the party and was the chosen drink over sweet iced tea and other soft drinks. This is a pretty punch to serve at Christmas parties or gatherings. 

If you choose to serve this punch at a Halloween party, the possibilities are endless since it has a dark red color to it. Find ways to make finger ice cubes with the punch to keep the punch cold or float plastic eye balls in it. Like I said endless possibilities. Just use your imagination! 

Loving this simple life I live! 

Friday, October 14, 2016

A Sad Ending And A New Beginning

My maternal grandmother is never going to go to home, again. She will never return to the home she lived most of her of 50 years of married life  and her 20 years of widowed life in. The home she brought her children home from the hospital to and where she raised her brood of 5. The home where she welcomed her 8 grandchildren in and where she worked on spoiling her 8 great-grandchildren. The home where she loved to invite people to eat and made sure they never left hungry. The home filled with laughter, noise, and loud discussions. The home chalked full of wonderful, happy memories and some sad ones as well. The home she no longer remembers in her Alzheimer's clouded mind. Now, the only home she remembers is the one of her childhood and life with her parents and 9 brothers. 

Her children made the painful decision a few months of ago to sell the house, but have been slow to implement. It was just hard for the to face and decide how to deal with all the stuff that comes with many years of living. However, a ray of light came in an unexpected form. One of my grandmother's great-grandson (my oldest nephew) asked if he and his brother (also my nephew) could possibly start renting the house. He is almost 22 years old, has a full-time with benefits, and is ready to leave the nest. His brother is just out of basic training and schooling for the Army Reserves and is also ready to leave the nest. After a discussions with my mother and her siblings, they decided to rent it to them. 

Now they are facing the daunting task of clearing out the house. Some of the furniture has been claimed, but some will remain. That left all of the other items of life to do something with. They opened up the house last Saturday for the grandchildren and great-grandchildren to come, take a look at all the stuff filled with memories, and take home some things to be a reminder of the grandmother we all love. 

It was bittersweet looking through those things, things that brought to mind sweet, wonderful memories. As we looked and choose, we reminisced and shared memories. It was hard and my mother and her siblings were overwhelmed with it. They had been working for almost a week before and are still working to clear everything out so my nephews could move in by the first of November. 

Most endings are sad, but in this case it has been made even sadder by the pernicious nature of Alzheimer's. For me, I think the death of my grandmother would have been easier to handle. Alzheimer's has slowly been stealing her form us for years now until she no longer even knows who we are. Yet, even with this sad ending, a bright new beginning is on the horizon for my nephews. 

They are ready to move on to the next stage of their lives. They are to ready to start making a home for themselves. They are grown up and both have girlfriends they are serious about. Their lives are just beginning and the future is theirs for the taking. The renting arrangement could even turn in to a possibility of renting to own. 

If my grandmother could understand what was going on, she would be happy to know that her home was going to be rented to two of her great-grandchildren. She would be glad to see her once happy home be filled with new memories to treasure by some of the family members she loves.

"Every end is just a new beginning
A chapter closed, but always printing
All memories earned in pain and laughter
One book to be closed, but a quest to be after.

If life is a cable and hope is the wheel
And love is the arrow in the Achilles' heel
One line was cut yet the thread is still spinning
For every end, hope delivers a new beginning

No need for words, goodbyes, or sorrow
There is never forever, but only tomorrow
When all doors close and we choke with despair
A new day brings open windows and fresh air

At the end of the road, on the edge of the earth,
I continue with purpose for all that it's worth
I take a leap forward, jump into the dark
There can never be an end when there's life in my heart." 
 
Poem by: Just Sierra
  
Living life simply and simply living!

Thursday, October 13, 2016

Our Trip To Dollywood: Part 4

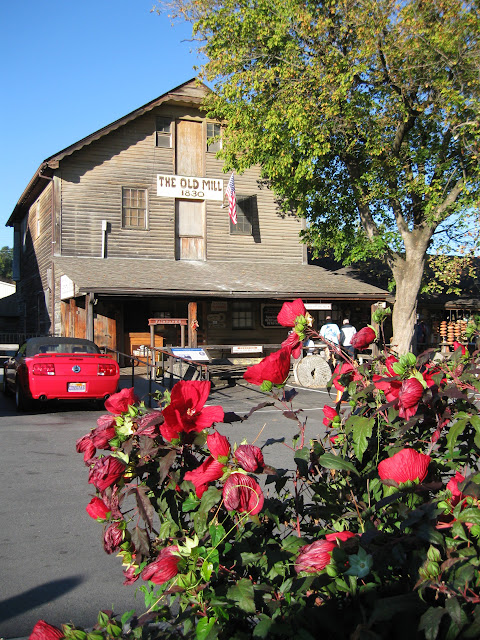
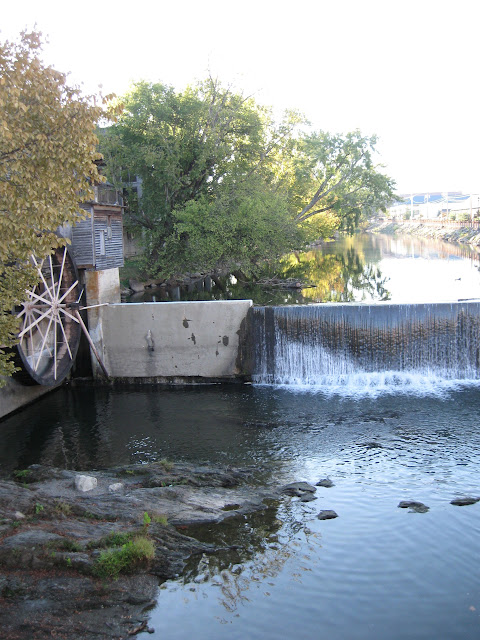
Saturday, Oct. 1st, we got up a little early so we could be at the Old Mill Restaurant when it opened at 8:00 am. The Old Mill Restaurant was once a grist mill that was a hub of activity in the Pigeon Forge Community in the 1880's. (If you want to learn more about its history go to the following link: Old Mill History.)When we arrived, we were seated right away and at a table with a view of the river. 

It wasn't long before a basket of banana nut muffins were on our table and our drinks were being served. After looking at the menu for a few minutes, we were placing our orders. DH ordered the Old Mill Country Breakfast with sausage. DD ordered the Old Mill Biscuit Breakfast with ham. I ordered the Old Mill Country Breakfast with ham. It was all delicious and we stuffed ourselves. 


Inside the restaurant is all wood.

 
After we paid, we walked next door to the Old Mill Store to look around. When we left the store, we walked on down to the bridge to take pictures of the river and the water wheel. We enjoyed our meal and visit to the Old Mill. 

(If you are planning a trip to the Pigeon Forge area, I would recommend planning a visit to the Old Mill Restaurant. The food is great and the service was excellent. It is one of those must sees.)


Soon after, we headed back to the campground to start packing up. We go left around 9:30 am. The ride back was just as beautiful as the ride up. We arrived home around 1:30 pm (or there abouts.) We started unpacking the van and the camper. 

It was a whirlwind of a weekend, but one we will always remember!

Simply enjoying the simple life God blessed me with! 

Wednesday, October 12, 2016

Our Trip To Dollywood: Part 3

As we entered the park, we took the advice we were given when we first went to Disney World - go to your left. People are naturally inclined to go to their right, but if you go to the left as you enter a park you will encounter fewer people. This advice has never failed us. 

When we came to the first ride, - which happened to be a roller coaster called Thunderhead - we got in the very short line to ride it. Oh, my, was it rough but oh, so much fun! They wouldn't let you carry any bags of any sort on the ride. After we got off I knew why, we would have lost them in the midst of the ride. In fact, I lost the cloth headband I was wearing, but it was worth it! 


We went on to ride several more roller coaster. DH rode of them in the park, but DD and I were more selective. My favorite was the Mystery Mine. DD's was the  FireChaser Express DH's was the Wild Eagle and his least favorite was the Tennessee Tornado. He also liked the newest roller coaster the Lightning Rod.

My favorite.


Yes, you hang upside down for a second on the Mystery Mine.

DD's favorite.


DH and DD are riding in the back car for their second time on the FireChaser Express.


DH's favorite.


DH's least favorite.


Some of the other rides we rode included; the Blazing Fury, the Dollywood Express, and the  Village Carousel.  The Blazing Fury was a gentle indoor roller coaster through a small 1880's mining town. The train ride was a peaceful way to spend about 20 minutes and the scenery is beautiful. It also gives you a different perspective to some of the attractions in the park. DD and I had to ride the Carousel. It is our little tradition. 


A view of the roller coaster Thunderhead from the train ride.
In between riding we did a little shopping in the many stores in the park. We stopped by the Grist Mill for some of Dollywood's famous Cinnamon Bread. We also stopped by the Sweet Shoppe for some fudge. There were a lot of craft booths and demonstrations set up when we were there. We stopped to watch a man and his horse making sorghum molasses. In the area around the Lightning Rod, there were a lot of classic cars setting around which were neat to look at. 

If you go to Dollywood, their cinnamon bread is a must get. YUMMY!

I looked everywhere with something with my name on it, a key chain or something. All I found was a kitchen. LOL!


A man and his horse juicing sorghum cane to turn into sorghum molasses.

Some of the classic cars sitting around Lightning rod.


The Lightning Rod was our last stop before heading out. We were exhausted but happy about the day we spent at Dollywood as a family. 

Living a simple life and enjoying the time spent with family! 

Tuesday, October 11, 2016

Our Trip To Dollywood: Part 2

Friday, September 30th, we slept a little later than usual. Once we were up,  DH went to MacDonald's (which was right down the road from the campground) to get us biscuits for breakfast. We then took our time getting ready for our day at Dollywood. We headed out about 9:30 am and made our way to Dollywood

After getting parked and catching a trolley to the park entrance, we turned in our letter to get our two free park tickets(which my MIL won at a silent auction) and purchased one more. We were in the park by 9:45 am and on our first ride shortly there after. 

The whole park was decked out in fall decorations and they had started putting up some Christmas decorations. Every nook, cranny, and corner was decorated with hay bales, corn stalks, pumpkins, gourds, leaves, sunflowers, and mums. They had several areas set up for the perfect picture taking opportunity. 

I am going to caption this picture like DH did on his FB page - "We don't know these people. The were just in the way."


Usually things like this creep me out, but I thought the pumpkin people were cute.


Christmas decorations going up.
We picked a good day to go. The weather was nice. A little cool in the morning, but just perfect by the afternoon. All the rides we rode, we walked right on or had to wait for one person to get on in front of us. 

This was our first time at Dollywood. We were impressed by the parks decor and theme. The fall decorations were beautiful. The rides we rode were a lot of fun. The train ride was a nice relaxing way to spend about 20 minutes. It was nice to get to see the house Dolly Parton grew up in. The schoolhouse was a nice peek into what school life looked like in East Tennessee in the 1890's. The chapel was absolutely gorgeous in its simplicity and I would love to attend a service there sometime. 


One of the negatives about Dollywood would be the amount of walking you have to do. It is A LOT of walking. So if you are planning a trip in the future keep that in mind. Another negative was the food choices. I wasn't that impressed. It was a lot of fast food and Southern type of food with a lot of fried things. I know fast food is easy for a busy pace and the other food it fits the theme of the park, but I wanted healthier options. We finally ended up getting a Steak-n-Cheese sandwich with peppers, onions, and mushrooms from "The Market". The sandwich came with homemade chips on the side. It was good and the healthiest choice we could find. 


We had a good time and a good day, but, boy, we were wore out when we got back to the camper. We were even too tried to out to eat at the steak house we wanted to try. DH just went out and got us some sandwiches from Chick Fil A. We all crashed shortly there after. 

Check back in tomorrow for more of our day at Dollywood and the rides we rode. 

Enjoy a simple trip as a family and loving every minute of it!