Showing posts with label Simply Green. Show all posts

Wednesday, July 5, 2017

Our Garden/Storage Shed And Cat House

Our garden/storage shed and cat house was once attached to our old mobile home and served as our laundry room. When we moved into our new home, DH saved our laundry room and with the help of my daddy attached to our outside storage shed, creating a bigger building with two separate sides. The old laundry became my garden/storage shed and the other building became the lawn mower shed. Years later when our rescue kitties came into our lives, it became their house where they sleep at night tucked safe away from the coyotes. With the help of DH's carpenter skills and my organizational skills, our garden shed has become a very functional tool in the caring of our simple home place. So today, I thought I would give you tour of the shed and how we organized it to work for us.

As you walk through the door, you will see a set of black metal storage shelves. We had used them in our old laundry room and were a perfect fit for our shed. I use these shelves to store a variety of items. I use various items to contain items. On the top shelf, you will see a coke crate full of small clay pots. We have an old radio to use outside. This is also where I store the cats canned food, which they get every night when I call them in for the night. The next shelf holds old glass bottles and other glass containers for fresh flowers to put the house. I have some of the small repurposed containers standing in old cake pans. I put old towels in the bottom to help them not wobble around too much.


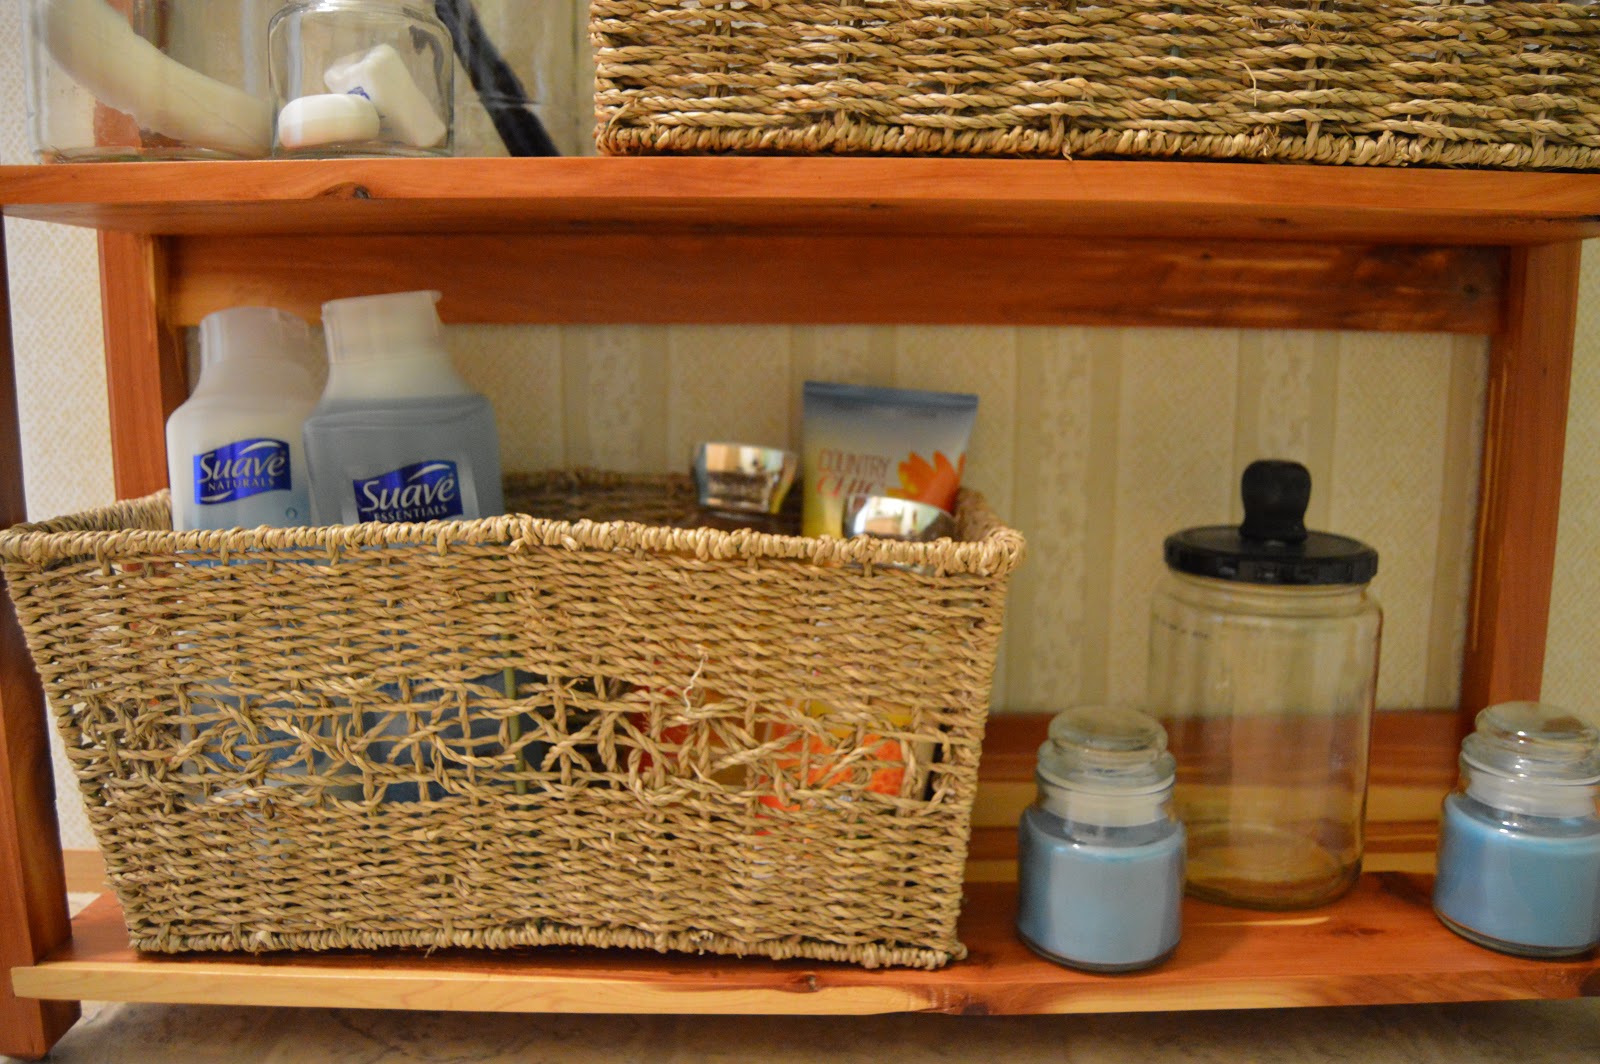
The next shelf has seeds containers and gift wrapping supplies on it. I also have plastic containers that can be used for various things. The wooden box holds citronella candles for when we host an event outside in the summer. The pink crated holds old towels, sheets, and blankets. The cardboard box holds old dish cloths, kitchen towels, cloth napkins, hand towels, and wash cloths to be used for whatever they may be needed for.  


The bottom shelf is full of old coke crates that hold old sheets and pillowcases. It also house our rash can. A bucket for any leftover garden soil I haven't used, yet, and a bucket to hold the scooped litter from the kitties litter boxes. I have an old clothes basket stuffed full of old linens to provide a cozy spot for the kitties to curl up in. 

 
Underneath the window, between the black shelves, and the storage shelves DH built, he built me a potting table. As with most other areas I use, I have made it pretty and filled it with things that mean something to me. 


My sweet niece gave me the "Live, Laugh, Love" sign that is attached to the window, for my birthday last year. I love how it compliments the area ~ color, birds, and all. I found a pretty water can that sits on the window sill all year round. DH nailed some nails into the wall that separates the storage shelving from my table, so I could hang up all of my garden tools. 


On the right side of the table top, I have flower pots DD has given me as presents over the years. The watermelon one holds measuring spoons for measuring out flower food, etc. The bigger blue one holds garden markers I use to mark the veggies I sowed. The other small pot holds the cats' hair brush. 


On the left side of the table, I have two flower pots stacked on top of each other. The colors really don't well in our home, so I use them for tool storage. I lined the top one with old kitchen towels, then added my pruning scissors, pruning shears, and a other little items. Other either side are things I won when we were playing cards. I like candles in place I may need to see if the power goes out. The other jar holds a pair of old scissors and pencils. The little butterfly sat in my childhood room and just seemed to find a new home on my potting table. 


The potting table has a shelf where I have plastic storage containers that hold miscellaneous items and all of the baskets I use for gardening. The basket on the bottom with the orange towel in it is the basket I carry around with me as I work. I place all of my tools in it, as well as old hand towels to wipe dirty hand on and a bigger towel to place on the ground when I need to sit. The other baskets are what I carry to the garden when I gather produce. Below the shelf is an old toy scooter that belong to my brother. I am not sure how I wound up with it, but I put it to good use by storing Seven Dust, Miracle Grow, and clay pots one. The big white bucket holds dry cat food, which they nibble on all day long.
 

The storage shelves DH built are sturdy and hold a lot of boxes and tubs. All of our Christmas, winter, Easter, and fall decorations are stored here. The lowest shelf holds tubs that are covered with old towels, because the kitties like to sleep on top of them.  


DH's part of the storage shelves is much smaller than mine, but they contain a lot of items. His side doesn't always look that neat. I straightened them up before I took pictures. You can also see the cat have use of part of his shelves too. 

In the bottom picture, you can see a clean litter box and a little red wagon lined with blankets. I try to provide a lot of comfy, different places for the kitties to sleep. Underneath the wagon is another basket full of linens for them. In the right corner, you can see a little bit of white showing. It is my old play table that we keep around in case we need it. I store buckets and containers underneath it. I also separate the cats plates when I feed them at night. Miss Bashful gets her plate on top the table. Miss Cooper gets her plate underneath the table. 


I truly believe in decorating and making the places you use a lot pretty and meaningful. It makes work a little less of a chore when you are happy to be there. I even add decorative touches to the door of this room for different holidays. During the summer, I have a cute little welcome sign on it that puts a smile on my face. 


Well, that completes the tour of our garden/storage shed and cat house. This little shed and the pretty inside are just a simply good place to have at you disposal!

Monday, November 7, 2016

A Paperless Household

Our household is a paperless household. What does that mean? We use no paper products. No paper towels, paper napkins, paper plates, cleaning wipes, dust wipes, Kleenexs. None, nada! Well, we did draw the line when it came to toilet paper. We couldn't find a steady supply of corn cobs or knew off anyone that saved old Sears & Roebuck catalogs. LOL! 

So, how do we cope without any paper products? Remarkably well. It was easy to transition over and required a little money to get us started, but we phased it in gradually. Plus, it saved us a lot of money on groceries that we could use on stocking up on items. 

Paper towels were replaced with dish cloths and dish towels. I brought a stack of cheap dish cloths and dish towels to use to drain bacon on or other greasy items on. To clean up messes, I keep a ready supply of cleaning rags on hand for quick clean up. 

I slowly replaced paper napkins with cloth napkins. I was very hesitant about this one. I was afraid if I didn't wash the cloth napkins everyday, they would get all gross and grow stuff, but that hasn't happened. I wash them and change them about twice a week.

Paper plates, cleaning wipes, and dust wipes were very easy to replace. We use real plates and wash them. Cleaning wipes and dust wipes were easily replaced by using cleaners and cleaning rags. 

Kleenexes have been replaced with toilet paper. I don't know about any of you, but with all lotions and scents they use on Kleenexes now, I get stuffier using Kleenexes. Plus, they irritate my nose and are paper thin. When my allergies are bothering me, I need something super duty. Toilet paper works much better for me and our family. 

Transitioning our house to a paperless house has been a simply good thing for our home and our family. It took a while to get where we wanted to be and we are now reaping the rewards of the money saved by not buying these products. Also, we aren't filling up the landfill with these items and helping to reduce the number of trees being cut down. Or, we like to think we are.

Think of ways you could reduce the use of paper products in your house today. Make a plan for transitioning and reap the benefits. It is simply a green thing to do!

Thursday, November 3, 2016

Simply Green: Old, Empty Bottles

I don't drink but I sure do love the bottles liquor comes in. Liquor bottles have very interesting designs and shapes. I especially like the Crown Royal bottle and Patron Tequila bottles. I collect them as well as other old bottles. The oldest one I have found is a Pepsi bottle from 1929. We found it in the dirt where we were putting in our first home. The only problem is what to do with them all. 

Over the years, my bottle collection has grown. I have even added empty maple syrup bottles to it. Some the older soft drink bottles I have are being stored, but I still have plenty of others to do something with.  I have some uses for them, but I am still looking for some other ideas.

Here are some of the ways I have come up with to reuse them:  
  • Use them as flower vases. This is my favorite way to use them. I arrange a variety of bottles filled with flowers on a table top or in a tray. Using bottle of different heights, you can create a unique flower arrangement. 
  • Use them as candle holders. Stick candles in them and allow the wax to melt and run down the sides to create an add effect. The glass of the bottles will help reflect the light which is an added plus. 
As you can see, I haven't thought of very many ways. So I have done a little research and have found some very creative ideas. 
  • Use them as photo frames. Once the bottle is empty, you can insert photos; along with beads, pearls, shells, sand, rocks or any other trinkets you can squeeze in through the neck.
  • Use them as soap dispensers. You can even leave the labels on them if it will add to the decor of the room it will sit in. 
  • Make bottle lights out of them. Drill a hole in the back of a bottle and run a string of lights through it. This would work great for party lighting. 
  • Glass Bottle Candles. Cut the bottom off of the bottle and place it over a lit candle. 
I really like some of the ideas I have found and will have to try them out. If you have any creative ideas on how to reuse old glass bottles, leave me a comment. I would love to hear form you! 
 
Simply green is a good thing!
 
Sources: 

Wednesday, November 2, 2016

Simply Green: Those Odd Glasses

All of us have them. Those odd glasses left over from a set of glasses that started out as a set of 16 but slowly dwindles down to 2 or 3. You go buy a new set, but aren't sure what to with the odd ones you have left over. Don't throw them out! Reuse them in a new way. 

One of the ways I reuse old glasses.

Here are some ways I reuse our odd glasses: 
  • Use them as pencil/pen holders. I have several odd glasses setting on or around our desk areas. I use the smaller ones, as well as the big ones. 
  • Use the to hold utensils in for a buffet,BBQ, or a cookout. I line them with a cloth napkin first to keep the silverware from hitting the glass and breaking it. 
  • Use the small or medium size ones for condiments. Put ketchup, mustard, mayo, or salad dressing in them when hosting a dinner or party. 
  • Use the small ones to hold food items for an ice cream sundae bar. 
  • Use the larger, taller ones as vases for flowers. 
  • Use the small ones as candle holders. I placed a candle in one and place the glass on top of an upside down glass. Instant candle holder pedestal. 

Here are some other ways I found to use them: 
  • Use them in you bathroom for toothbrush holders. 
  • Use them as a flower pot. Start out with a few rocks on the bottom, then some soil. Find a plant and plant it. 
  • Use them in your office area as containers for paper clips, push pins, and other office supplies. 
  • Use them on your nightstand to hold your glasses in while you sleep.
  • Use them as an instant speaker for your smart phone. By dropping them in an empty glass, it automatically amplifies the sound. 
  • Use them as drinking glasses for a dinner or cookout you are having. There is something whimsical and casual about mismatched glasses and dishes. 

So the next time you are thinking about throwing out those glasses, stop and think of another way you could use them! 

Simply green is a good thing! 

Tuesday, November 1, 2016

Simply Green: Old Cake Pans

What do you do with old cake pans or pans that you no longer use because they are scratched, stain, or even has rust spots? Do you throw them away? Have you every thought of ways to reuse them? Did you know there are ways you can reuse them? 

Today's post is all about ways to reuse these pans. I have several pans that I received as wedding gifts and over the years they had become worn, stained, and rusted. I started to throw them out, but then I stopped myself. My mind immediately started thinking of ways to reuse them. 

Here are some of the things I came up with:
  • Use them to water the little 6 annual flower packs you buy in the spring. The packs fit into a rectangular pan really well. Just pour a little water in the bottom to help keep the flowers moist until you can get them set out. 
  • Use them to lay bulbs or tubers in to dry for winter storage. Last year I pulled up my sweet potato tubers and stored them in a large rectangular pan. I sat the pan on top of the frig in the laundry room over the winter. The tubers dried well in the pan and they were contained. 
  • Use them to set other flowers in with water until you are ready to set the flowers back out in another spot. I have done this with day lilies. It works well. 
  • Use them in to store items or collections in. In my garden shed, I am using several rectangular pans as containers for my vases. This helps me keep them together and organized. 
  • Use the round cake pans underneath flower pots to catch any water that may come out. 
  • Use them in the garden to put the veggies you are harvesting in.
While I have reused my for practical purposes, you can get very crafty with them. I have seen some of the round pans glued to a pedestal and used in kitchens to hold fruit or in bedrooms for a catch all for jewelry and other items. I have seen rectangular pans or bundt pans used for a cactus gardens. I have seen the round pans painted, a mirror inserted in them, and hung on a wall as mirrors. The possibilities are endless. 
 
So before you get ready to throw those old cake pans out, put your thinking cap on and get those creative juices flowing. You may just come up with some pretty and useful for your home or some nice to give as a Christmas gift. Or you may find that you have a use for them just in your every day life. 
 
Learning how to reuse things instead of throwing them out is simply a green thing!  

Thursday, August 25, 2016

Homemade Apothecary Jars

When I started thinking about how to redo our guest bath and what to put on the cedar shelves, I knew I wanted some sort of apothecary jars. I started looking online for some, but soon realized they were way out of my price range. However, I remember saving a pin on my Recycling, Reusing, & Repurposing board on Pinterest on how to make homemade apothecary jars. So I looked at that pin for inspiration as I decided to make my own.
 
Picture via Pinterest saved from Decorating-Time.com

I started this project by looking at all the food jars we had in the house. Looking for the shape and size I wanted. As we used the food in the jars, I would save them until I decide which ones would work the best. I ended up with a Barilla marinara sauce jar and two pickle jars. I washed them well and let the air out for several weeks. Next, I soaked them in soapy water for a few days to remove the labels and the glue they were attached with. It took a little elbow grease but eventually I got all the gunk off of them. 


One of the two different kinds of pickle jars I used.

As the jars were airing out and soaking, I went to Hobby Lobby looking for some sort of knob to go on the top. I looked at various pegs, dowel tops, finials, and candle cups until I decided on what looked just right. I choose 1 1/4" birch candle cups. I also looked at candle sticks to put the jars on, but decided against that because it would make them too tall to fit in the shelves.

Picture via Hobby Lobby.

The next step was to decide on what color to paint the tops and the candle cups. I couldn't find a green or blue to suit me and I kinda of had black in mind right from the start. So I landed on a black Krylon spray paint in a satin finish.


Picture via Walmart.com


Once I had all my supplies together, I was finally able to get started. I spray painted the lids and candle cups several times. The metal lids were a little difficult to paint, but once I applied the right amount of paint layers to them, they turned out great.


The lids all painted.

Glue gun fun was the next step. I glued the candle cups on to the lids with the hole part facing down and let them set up.  

The candle cups turned into knobs for the tops of the jars.

When the glued set up really well, I filled the jars with various items and then they were ready to go on the shelves.
 
All ready for their new home.

I was very pleased with the way they turned out. I have also got a lot of compliments on them. The only bad thing I have to say is that with the humidity in the bathroom I have had to reglue the knobs on top, but that is no biggy. They fit in well with the other decor and look nice on the shelves. 


Homemade apothecary jars are simply a good thing!

Wednesday, July 20, 2016

Old Bed Linens Get A New Life

Blankets, sheets, and pillowcases are other items that can be easily reused and repurposed. All of us have them and when they are no useful on the bed, they can be useful somewhere else. Here are some of reuses and repurposing ideas, we have come up. 

Old Blankets
  • They are great to use when getting up leaves. Lay them on the ground and rake the leaves onto it. By pulling up the 4 corners toward the middles, you have a handy bundle to carry the leaves off to where you are going to dump them. 
  • Use them for bedding for pets. Laid on top of a cushion of towels, a blanket provides plenty of material for an animal to snuggle down in.
  • Use them as a ground cover when you are having a picnic. It will provide a layer of protection between you and the ground. It makes a clean surface to lay the food out on. 
  • Use them when moving furniture. Lay them on the floor, then lay or set the piece of furniture you want to move on it. The blanket will enable you to drag the furniture across the floor by pulling on it. It will also help prevent making any scratches on the floor. 
  • If your shade tree mechanic needs something to lie down on when he is under a car, an old blanket is a very useful thing to have around. 
  • Old blankets are just the thing to lay down on a sofa or a couch when you have pets. They can claim the blanket as their own not realizing you are protecting you furniture from getting hair all over it. 
Old Sheets
  • Old top sheets a great for adding another layer of warmth in the winter. A few winters ago, we had a very cold winter. We were using all of our throw blankets and still needed an extra layer of warmth. So those old top sheets came in handy. 
  • They are also great to take camping. Whether you camp in a tent or a pop camper, old top sheets are great to have on hand when you need an extra layer of warmth. 
  • Ladies when it comes to that time of the month accidents can happen when you are sleeping. Laying a doubled up old top sheet down on top of your bottom sheet will provide an extra layer of protection to help you from having to change your sheets in the morning or messing up your mattress. 
  • Both the bottom and top sheet of an old set of sheets can be used to get up leaves. 
  • Old sheets are another great source for bedding for pets. 
  • When storing furniture, old sheets are perfect for covering the furniture up. We used a lot of them when we moved furniture out to put down our laminate flooring. 
  • Old sheets make great drop cloths when you are painting or doing some kind of work that requires a layer of protection.
  • When a late frost is expected, we use old sheets to cover up delicate flowers and veggies in our garden beds. 
Old Pillowcases
  • When you need to wash some delicates on your washing machine, place them inside an old pillowcase. Secure the opening with a piece of string or a rubberband. That way they will be protected from being caught on something and pulled out of shape. 
  • If you need wash some of kids stuffed animals, place them in an old pillowcase and secure the opening. This will keep them from getting beat up in the washing machine. It also helps contain any of those little parts that may come off during the wash. 
  • They make a good sack to carry apples or other fruits and veggies in. 
I haven't used as many old pillowcases has I have blankets and sheets. The ideas listed above are things that I have done and I am speaking from experience. Curious to find more use for them, I started doing a little research and found some very useful info. The links for what I found out are listed below.  
  1. 10 Creative Ways To Reuse Old Pillowcases
  2. Cool And Creative Ways To Reuse OldPillowcase 
  3. 5 New Uses For Old Pillowcases
  4. 12 Ways To Use Extra Pillowcases 
  5. 30 Ways To Re-Use Pillowcases 
Old bed linens simply have to many uses to be thrown away. So start looking for ways to reuse and repurpose yours today. 

Living a simply life and loving every minute of it!

Tuesday, July 19, 2016

Old But Still Useful

For some reason, I feel like I might be referring to myself with the title. LOL! Oh, well, on to the real subject of this post - old, worn-out bath towels, hand towels, wash clothes, kitchen towels, dish clothes, and cloth napkins. Our first impulse is to throw these items out when they become worn, get frayed edges, or get holes in them. Don't do it! They can be reused and repurposed in so many ways. Here are some of the ways we reused these items.

Bath Towels 
  • Use them as bedding for your pets. They make nice cushioning and can be easily washed. In the building, the cats sleep in a night I drape them over surfaces to keep them from getting dirty from muddy footprints, lots of hair, and cat litter debris. 
  • Use them to dry your animals off when you give them baths. 
  • Use them to line the bottom of pet taxis on trips. This way if the animal gets sick it will make for easy clean for the pet taxi. The pet maybe another story. 
  • Use them to lay on the ground to provide you a clean, dry place to sit while working in your gardens. 
  • Use them for any spills or to clean up other messes that would ruin something else. They are old and can be easily replaced.
  • Use them in the wintertime as a mat in your laundry room or mud room to set wet, dirty snow boots on. The towel will soak up any water and help to keep your floor clean. 
  • Use them to line tubs or boxes that you are storing breakable items in. They will provide a cushion layer that will help protect your delicate items. 

Hand/Kitchen Towels/Cloth Napkins
  • Hang one near your outdoor water spigot to dry you hands on if needed. Since they are old it won't matter much if they are out in the elements. Put one near your rain barrel for the same purpose. 
  • Great for drying things off such as outdoor furniture. 
  • Use them for messes and other clean up jobs that would ruin a good towel. 
  • Useful as grease rags for the shade tree mechanic. DH almost exhausted our supply when he rebuilt an engine. 
  • Use them to wipe your dirty hands or tools on when you are working out in your garden. 
  • Use them to wipe down your car after you wash it. 
 
Wash/Dish Cloths
  • Use them to wash those really messy, mildew items that can be found outside. I use them to wash flower pots, litter boxes, windows, buckets, and rain barrels.
  • Use them to wash your vinyl siding, windows, and over hangs.
  • Use to wash your cars with or as grease rags. 
  • Use them to wrap breakable items in for storage. 
The uses I have shared are only a few of things that you can do with items like these. Their usefulness doesn't have to end when you no longer can use them in the bathroom or kitchen. We use them until they are almost falling apart. Since, they can easily be washed they can be used over and over again. 
 
Giving old things a new life and purpose is simply a good thing! 

Monday, July 18, 2016

Recycle, Reuse, & Repurpose

Recycling, reusing, and repurposing is something all of us should try to do. We throw so much stuff away that could be recycled and remade into something new. Not to mention things that could be used for something else or reused in a new way. 

So as part of the ways we are trying to be "Simply Green" household, I am going to share some of the ways and things that we recycle, reuse, and repurpose. So be on the lookout over the next few days as I share ways to bring new life to some tried old items. Some of them you may have not even thought of that could be reused or repurposed.

Living a simple life in such a way to preserve the beauty world God gave us to care for and live in. Loving life and enjoying every minute of this simple life we live! 

*****************************

I also have a page on Pinterest where I have pinned some really neat ideas on the 3 R's of living "simply green." You can find the page at "Pinterest - Recycling, Reusing, & Repurposing."

Friday, April 22, 2016

clean house!

If you are looking for a home keeping book that promotes the use of environmentally friendly cleaning solutions then clean house! is just the book for you. Written by Alison Haynes, this book offers ways to keeping your home while minimizing the use of chemicals. She also offers "green ways" to deter pests in your home and ways to save water/energy. 


clean house! talks about the importance of clean air in your home and how to go about making that way. Alison covers the harmful effects of chemicals used for cleaning and found in the air. She talks about the importance of keeping dampness and humidity in check. Ways to clean and declutter you home are also discussed. She also provides recipes of homemade chemical free cleaners. 

This books has sections on how to go about laundry and cleaning each room in your house. There is one whole section on the outdoors which contains gardening tips, ways to save water, and chemical free ways to control outdoor pests. The last sections is a vocabulary section of sorts on housecleaning terms and chemical names. 

By no means am I a tree hugger, but I do believe we were given the charge to take care of this beautiful earth God gave us. I also know that humans and chemicals don't mix very well. I also know that the things that God put here on earth for us to use are the best products to use around our families and in our homes. While I have not completely gotten rid of my chemical cleaners, this book has given me many different ideas that I have put into use in our home. So if you are leaning toward a "greener" home, then a clean house! is a must read. 

Living a simply "greener" life in order to take care for this beautiful place God gave us to live in!  

Wednesday, February 24, 2016

Curing A Dry Winter Home

Does the dry, low humidity dry you out in the winter? It certainly does me and DH. This winter hasn't been that bad, but a few winters ago the humidity was so low we kept a sinus infection all winter from being dried out. It was that winter that I went searching for ways to add humidity to our house naturally. We implemented several of them and it helped tremendously. 

Tips For Adding Humidity To Your Home

  • When you get done taking a shower, leave the shower curtain drawn back or the door open. A bonus to doing this is that I have seen less water stain build up on the surface of the shower by doing this.
  • Use decorative bowls filled with water. Set them around the house in the bedrooms especially. You could also use vases. Change the water once a week.  
  • Place ceramic or metal bowls filled with water on top of heat registers. Obviously, you will need to place them in an out of the way place.
  • When you are cooking food or boiling water on the stove top, leave the lid off so the steam is released into the air. 
  • Drying clothes in laundry room or bathroom. This is easy to do with the sweaters we wear in the winter. Those delicate items that you don't want to put in the dryer will work, too. 
  • Houseplants are an easy, pretty way to add moisture to your home. When you water or spray them, they release moist in the air through transpiration. 
  • Believe it or not, your pet's water bowl releases moisture, which is a good reason to have a pet living in your home. Right?
  • Buy a sprayer bottle that has a mist feature and fill with water. Go around and spray a fine mist in every room, being careful not to mist too heavily.
  • After taking a bath, leave the water in the tub until it has completed cooled. The cooling process will release moisture into the air. 
  • If you own and use a dish washer, don't use the drying cycle. Simply open the door and let the dishes air dry, which will release moisture into the air. 
I hope these ideas will be of some use to you and help relieve the dry air you may have in your home during the winter. 

Forever looking for ways to live life in a way that helps us take care of the beautiful earth entrusted to our care and live it simply!